Saturday, 29 June 2013

It's Grrrrate. . . . . .memories of Tony the Tiger.


Good morning duckadees. What a miserable day yesterday was weatherwise so hopefully there is improvement in your part of the world.

Have been playing with filling apertures again and luckily the bits on this die were big enough for me not to indiscriminately hoof in the bin.
I started with a 6x6 card base cut from cream linen card. I then cut another piece a teensy weensy (that's a technical term) bit smaller. Out of this I cut the Spellbinders Die D-lites Grate Works 4 times. You may have spotted that I didn't line them up in the same direction as at that point, I didn't notice that the centre cross shaped piece has two pointed and two non pointed ends but I can live with it.
I kept the cream die cuts to use another time and cut 4 more of the die out of gold mirror card and kept the apertures to use another time also.
I stuck double sided tape to the back of the cream aperture piece and then popped in the gold die cuts and also the cream centre diamonds and that, as they say, was that.
I haven't put a sentiment on yet as I quite liked it without.


The following pic shows the offcuts that I had left to reuse. I had already popped 2 of the cream die cuts into the gold apertures. I had deliberately cut 2 of the gold ones on the same sheet, on a diagonal with a view to doing something with it.


I will post pics of the 3 cards I then made from these bits in the next posts.

Until then, take care and thank you so much for having a paddle in the pond. Your visits and comments are always appreciated.

TTFN
Ang x


Thursday, 27 June 2013

Just when you thought it was safe to do apertures.........


Good morning everybody. Hope its all good with you and yours. Hope I haven't put you out with blogging at the wrong time on Tuesday......it certainly confused me !!!

Well Gail, it's like this. After the my doh!!! moment on the last card, I go and do it again on this one......Grrrrr !!! At least my glitters are getting a summer outing.

I started with a 6x6 base cut from a pale blue card. I then cut a slightly smaller layer from some turquoise card.
With the turquoise piece, I cut one of the Spellbinders Bracket Borders out of it, twice at the top and twice at the bottom. I then cut one of the Spellbinders Les Papillons 2 out of the middle and one of the butterflies from the Spellbinders Jewel Flower and Flourishes out of either side and promptly hoofed the bits into the bin (you know what's coming, don't you?)
I cut the butterflies again using pale blue card.
Then I stuck double sided tape across the back and popped the pale blue butterflies into the apertures in the turquoise card, then realised I had binned bits I needed again. The air was blue-er than the card by this point so out came the trusty pale blue glitter.


I stamped the sentiment (which I thought was quite appropriate by this point) with blue pigment ink then heat embossed it with Cosmic Shimmer clear powder.
I then stuck this layer flat to the base card.

I think that it turned out ok, despite another muppet moment. If there is another one, I'm not admitting to it.

Have a good day folks and hope its warm and sunny in your part of the pond. Close 

TTFN
Ang x


Tuesday, 25 June 2013

Better late than never..........


Good evening folks. I am soooooo sorry for my gross tardiness. In my defence, I had a busier day than anticipated yesterday and it was only when I got up this morning I thought "Ooops".
I then was busy this morning and out all afternoon so here I am, very late. 
Thank you to Heather for being gracious about my leaving a message on her blog. In return, she will be advertising her Pirate Decor business on here later. . . . . . . . . . . . She could call it "Jolly Rogers" for obvious reasons, boom boom!!!

Hope that the card was worth waiting for. It was a bit of an experiment but seems to work.

I cut a 6x6 base card out of white hammered card and inked the edges with Tim Holtz Spun Sugar Distress ink.
I then cut a slightly smaller layer out of the same card and cut the largest Spellbinders Butterfly Circles out of it. Next, I cut the Spellbinders Die D-lites Medallion Four out of the middle of the circle. I then popped the circle back into the aperture from whence it came.
As I wanted to re-fill the butterfly holes with alternating colours of butterflies, I used the largest Butterfly Circles again to cut some fuchsia pink and lilac card as per the following photos,


I had two pieces of scrap to do the job rather than cut one of each out of bigger pieces of card.
Like a muppet, I threw the bell shaped bits away..........more on that later.
I had precisely the right amount of butterflies to alternate so I taped a small piece of purple card behind the Medallion aperture, the double sided tape across the whole back of the layer. I then popped all the butterflies into the gaps and then it dawned on me. Where the gaps for the bell shapes were, there was exposed tape beneath........Doh !!! After a lot of bad language I decided to fill the gaps with pinky purple glitter rather than re-cutting the die again just to get the bell bits.......phew !!!


Sentiment stamped in purple and heat embossed with Cosmic Shimmer Clear Powder and some spare lilac butterflies popped in the other corners (I always save the butterfly waste) to finish......voila !!!

Finally, just to clarify, on my previous post, the cards are one's that I made last year in the days when I thought "I don't need expensive dies and a machine to cut them" ........in this house, there are 3 eras BC, AD and BSW (Before Sue Wilson). 
I do still make the simpler cards but my Calibur usually starts calling to me.

Once again, apologies for the lateness. Hope you have all had a good day.

TTFN
Ang x


Sunday, 23 June 2013

Life before Spellbinders.............


Hello everyone. In the interests of diversity again, hope that you are as fit as the tofu deliveryman.........think that's all food groups covered now.
Firstly, a very warm welcome to the pond for Kate. Sooo glad that you are with us and hope that you have some fun with us along the way.

Now, I'm going a bit retro, partly as I have had a very busy day and I am finally doing my blogging at nearly 11pm as its the first chance I've had and partly, to remind myself that there was life before Spellbinders. These are cards I made when I took up card making again following a chance viewing of C & C. 
Not a Spellbinder in sight, just the odd punch and pinking shears. I love the pink heart paper on the one above (wallpaper sample again, I'm afraid) Apologies for picture quality as I was just snapping these before the blog was even a twinkle in my eye.


I still love Forever Friends and Tatty Ted and they are still popular cards whenever I go car booting.


Some folks almost seem embarrassed by using these sort of bits and bobs to make cards but I think they are lovely still, even though I have got a bit more advanced now.
I guess what I'm trying to say is, a lovely card is a lovely card, whether its taken you 10 minutes or 10 hours and whether you have used equipment costing £1 or £100. As long as we all find a bit of joy in what we do, its all good.

Enjoy your Sunday duckettes !!!

TTFN
Ang x


Friday, 21 June 2013

Congratulations, The Sequel...........Emboss Hard With a Vengeance !!!


Good morning my little Duckadees. In the interests of diversity, today I shall ask if you are as fit as the fishmongers cat.

Todays creation was a card I made for my best chum to give her niece, to congratulate her and her fella on their engagement. I'm hoping that the card is now with the recipient so taking the chance of displaying it. I am also hoping that it doesn't fluoresce as much as my Purple Peril.
Her wedding colour scheme is purple and gold so that's what I went with. Also, best chum wanted a less is more card so hopefully I achieved that.

I started with a base card cut to 8x8 from an A3 sheet of PMD purple card.
On to this, I matted a smaller piece of gold mirror card which I had pierced around the edges.
The top layer is a smaller piece of purple card. I used a corner punch to round them off, then punched hearts out of each corner, then ran it through the GC with the Pronty Heart of Flower Mask Stencil to emboss it.
I then cut a heart out of using a Sissix heart die and then with the resulting heart I cut a smaller heart from that too.
I foam mounted the top layer to the gold mat along with the small heart I had cut, then punched some hearts from gold mirror card and stuck them around the embossing and on the centre heart.
The sentiment was just stamped with VersaMark and heat embossed with Cosmic Shimmer Clear Powder, then mounted on to gold mirror card.

I am awaiting feedback from the recipient but my chum loved it. Hope that you all like it too.
Close ups below and thanks for popping by the pond.

TTFN
Ang x


Wednesday, 19 June 2013

Birthday Butterflies.........


Good morning everyone. Hope that we are all as fit as that butchers dog (apologies to any vegetarians, vegans or pescetarians).
Hello to Gwen70 and thank you for your kind comment...........in fact thank you one and all !!!

Today's card was a quickie I needed to do. Its not a conventional size as it was an offcut from another project.
The base is PMD white hammered card and I cut one of the Spellbinders Bracket Borders along the bottom. I started in the middle then cut either side. Both sides did match but then I scuffed the right hand edge and had to trim a bit off (gnashing of teeth)
Edges inked with a smidgin of Dusty Concord Distress Ink.
I popped the sentiment on with foam pads after stamping and heat embossing.
I cut 3 Spellbinders Les Papillons 2 butterflies, 2 in purple and 1 in white and also 1 of its embossed shadows in purple.
I stuck the shadow flat in the middle and then the white one, with its wings free on top and then added 2 purple gems onto its antennae.


The purple butterflies were added either side, with their wings free too.
I then added some purple gems along the bottom to complete the outside.
As the bottom edge looked a bit bland as it was white on white, I cut a strip of purple card, edged it with the Bracket Borders cutting edge and suck it inside the card, then Dusty Concorded the edges. Voila !!!


Thanks again for popping along to the pond. Have a great day yawl.

TTFN
Ang x


Monday, 17 June 2013

Deja Viewing...........


Good morning everyone. Hope you all have a spring in your step and the sun in your eyes (except Patricia with her poorly eye).
Thank you for the lovely comments about may canvas. So glad that some of you have been inspired to dust off those canvases you had at the back of the cupboard. It really wasn't difficult and took next to no time to do.

Now, I know you will think that you are seeing double with these two cards as they are variations of two I have already shown but I thought that you may like to see how the same card can be done a different way.
This plant pot is different as I made the pot out of cardboard that I then painted with a Dulux terracotta matchpot. The original was done with brown wallpaper, if you remember. This method is much better as its obviously a more authentic colour but also as you get a nice texture to it. 


I also popped a few more flowers on this one and it was made for someone who wanted it for a friends 60th birthday.


This is my silver anniversary version of my "congratulations" card. I have made this for my best chum to give to her brother and sister in law.


The flowers are made from white card but I have then marked the edge of the petals with a Metallic Silver Promarker.

Both cards basically made the same way as the originals but each with a little twist.

Brand new card in a couple of days so take care folks.

TTFN
Ang x

Saturday, 15 June 2013

Home is the place where our hearts belong........


Good morning my little duckadees. May you all be in good health (or at least feeling better dear Ita) and basking in glorious sunshine.......ever the optimist!!!
A warm welcome to Anne, who has dipped a toe in the pond. Hope you enjoy visiting.

And now, for something completely different............a canvas. 
I bought some on offer in Hobbycraft as I thought it would be fun to have a play and it was.
I had a dabble with a large canvas and some acrylics a few years ago when I wanted something abstract for the bedroom (steady now !!!).
It was a bit of a Jackson Pollock moment, although Mr Duck said it looked more like Jackson.......well, I shall just say he changed one of the letters in the surname!!!
Needless to say, I haven't bothered since (but my picture is still on the bedroom wall).

Take one 10x8 stretched canvas (pre gesso-ed). I stamped the sentiment in the corner with VersaMark and heat embossed with Cosmic Shimmer Clear embossing powder so I could get a resist effect when I applied the ink. You need to make sure there's good contact as mine did blur a bit (hence no close up......don't you dare zoom in!!!).
I then applied Tim Holtz Distress Inks with sponges, just sort of blending them about a bit (sorry for the lack of technical terminology). I used;
Peacock Feathers
Shabby Shutters
Mustard Seed and
Spiced Marmalade.
I then wet the end of my fingers, flicked water at the canvas then rolled some kitchen towel over it. I did this a couple of times.
Next, I gave the canvas a light spray with Cosmic Shimmer Vintage Mist in Tarnished Gold and let it dry.
After about 20 mins, I took the loose butterflies from Splodgeaway's Bountiful Butterflies set and inked through the masks with the same inks as earlier but with more intensity. I would recommend than you pop something under the canvas to support it, in case the pressure when inking through the masks stretches it. 
Here is another angle to try and show off the gold mica shimmering.......it does really shimmer in the flesh.


I know its not exactly Sheena Douglass but I'm chuffed with it. It will only be staying in Chateau Canard because of the blurry sentiment but it has made me want to do some more, so watch this space. I may also start popping some pics of my jewellery on as well, as that was my first love, that I have not forsaken.
Anyhoo, all from me for now so be good.

TTFN
Ang x


Thursday, 13 June 2013

Congratulations............(no I'm NOT a Cliff Richard fan; it's a vicious rumour!!!)


Good morning one and all. Hope you are all bright eyed and bushy tailed. I have been trying to catch up with some cards that I have been asked to do but then I get way laid with other things. . . . .isn't it always the way?
Before I go on, just wanted to say a big "Get Well Soon" to poor Ita, who is in hospital. Hope you have a swift recovery chuck.

I have been holding onto today's card as there have been a few Labels 4 cards flying around blogland and as they don't seem to be drying up, I thought "blow it !!!" I had been asked to make a wedding card in sky blue in deference to the groom's favourite football team so this is what I came up with.
When I presented it to the lady (the brides mother) she said would I mind doing one with sky blue buddleijas instead !!! (one of life's grit your teeth moments)
This was made in a similar way to the "Best Wishes" black and gold card so I won't repeat all instuctions.
I made the centre portion and Elegant labels 4 frame bit first and increased my mats and layers outwards accordingly.
The sky blue card is pearlised card from a local craft shop.
The flowers and leaves are made from the Bitty Blossoms die set using white card which I had inked to the shade of blue I wanted with a Papermania light blue pad.
Sentiment stamped with VersaMark and heat embossed with Stampendous white powder. I then cut it out with victorian pattern scissors. This was then stuck to a Labels 8 mat. 
Close up below.

I have done another for a silver anniversary which I will post in a few days. 

Well, that's me for now as I have to sort out dinner (This post is scheduled !!!). Happy crafting to you all.

TTFN
Ang x


Tuesday, 11 June 2013

What...no Spellbinders?????


Good morning folks. Hope everyone is ticketyboo. What is going on with the weather again. Its been warm but overcast. I had enjoyed feeling the Sun on the old feathers !!!
First, some messages for our sponsors.........
Welcome back from your travels Jackie. A change sometimes does us good eh? Hello to Kim. Thank you for popping by. . . . .and well done to Patricia and Hazel for training their husbands so well . If either of you have a manual I can borrow, I would be grateful. Mr Duck actually rang me at work once to ask how to switch the vacuum cleaner on............oh how I laughed, until I realised he was serious.

Anyhoo, today's creation is a first for me. Apart from the odd bit of background, I have not really done much with my distress inks. I had to do a quick belated birthday card so I thought I would see what I could do with just a mask and some inks.
The card base was 6x6 white PMD card with the corners punched.
The top layer was white card cut slightly smaller than the base and with corners rounded again.
I then applied different Tim Holtz Distress Inks to create the background. I used Bundled Sage, Shabby Shutters and a touch of Wild Honey for the "grassy" area. I then sponged Broken China  over the rest of the card, in various degrees of light/dark for the "sky". A smudge of Mustard Seed sufficed for my "Sun".
I then ran this through the Grand Calibur with the That Special Touch Daisy Silhouette mask to emboss it. I put the mask back over the embossing and inked through with the greens again for the stalks and also Dusty Concord and Victorian Velvet for the flowers and butterflies.

I'm quite pleased with my first foray into "inking" and I can't believe I can still make a card without reaching for a Spellbinder !!!
I have re-posted a picture of the purple butterfly card below and hope, on its new background, you can view it without darkened glasses. Rumour has it, that from Space, you could see the Great Wall of China and my purple card lol !!!

Have a good day folks and thanks, as always, for popping along to the pond.

TTFN
Ang x


Sunday, 9 June 2013

Red and white again.....


Hello my little chickadees (or should that be duckadees ?) and how are we all today ?
A big welcome back to the Turkish Delights, hopefully bronzed and well and with belly dancing skills finely honed (and more importantly with houses still standing if the Mr Delights were home alone)
This was the first card that I made with the Spellbinders Elegant Labels 4 and Die D-Lites Medallion 4. I like to cut things out of white card when I first get new dies and with this I just thought "waste not want not" and made a card.

The base is a piece of PMD white card Hougied in half to give an A5 base.
I then matted and layered with red then white card.
I cut the Medallion 4 out of the middle of the Elegant Labels 4 "test" cut. I lined this up on another red layer, without sticking it yet and marked the position of the Medallion on the red card below.
I then lightly glued the marked area on the red card and gilded it with Indigo Blu Chariots of Fire flakes. The label was then stamped with the best wishes, heat embossed with gold embossing powder and glued onto the red gilded layer. This was then stuck to the top layer on the base.
A little red organza double bow was tied and added to the top.
Close up of the gilding below.

Hope you are all having a great weekend and thank you so much for all of your kind comments and suggestions.

TTFN
Ang x


Friday, 7 June 2013

Love ........


Good morning one and all. Hope this finds you fit and well and basking in this joyous bit of sunshine.......do we think summer has arrived?
Have decided to go with a subtle card today after scaring you all with the dayglo butterflies. I have re-photographed the luminous card and hopefully, when I re-post it, it will be more its true colour will shine (rather than fluoresce).
I made this for a colleague of Mr Duck for him to give his wife on Valentine's Day (is that worse than showing a Christmas card ?)

I started with an 8x8 PMD (Paper Mill Direct) white card base. I then embossed some more white card, slightly smaller than the base, with the Cuttlebug Kassies Brocade embossing folder.
I cut a strip out of this piece on a diagonal and foam padded both resulting pieces to the base card, leaving a gap to accommodate the flowers.
The flowers are cut from red PMD card using Spellbinders Bitty Blossoms and the red heart was cut using a Sissix Heart die.
I stamped the heart with a Papermania stamp using VersaMark and heat embossed with Stampendous fine detail white powder. I then foam padded the heart to the centre of the base and the sides and glued the flowers to the base, in the gap, either side of the heart.
Finished off with a bling heart in the other two corners.


This is the box and tag that I made for the card to go in. The hearts are stamped in red pigment ink and heat embossed in Cosmic Shimmer clear powder.

Hope this one doesn't force you into your sunglasses or welding goggles.
Have a fabulous Friday and wonderful weekend !!!

TTFN
Ang x


Wednesday, 5 June 2013

Purple Peril


Good morning my little ducklings. I hope that you are all well and enjoying the warm weather. 
A few messages before I get stuck into the card, if you don't mind.
Firstly, a very warm welcome, or should I say una muy calida bienvenida,  to Wendy who is now swimming in our little pond. Hope you enjoy having a splash with us!!!
Secondly, to dear Ita, I have managed to get as far as becoming a follower but it still won't let me comment. I will persevere but meantime, your sepia card is lovely.
Lastly, hi to Patricia and Hazel our Turkish Delights. Hope you haven't got caught in (or indeed caused) any riots. Hope your'e chilling and thank you for popping by whilst on your hols.

Right then, I've titled this purple peril as I'm not 100% sure about it but its done so there you go.
The base is 8x8 white linen card from Paper Mill Direct (PMD).
I matted this with some silver linen card from C&C. I then cut a layer out of PMD purple card and cut the Spellbinders Butterfly Magic die out of the left hand side. I also cut the butterfly area of this die out of silver card and popped this on top of the original butterfly.
The sentiment was stamped with VersaMark and heat embossed with silver embossing powder.
I did then also heat emboss two stamped butterflies at the top and at the bottom but I wasn't happy with them so I stamped and embossed some different butterflies on separate card, cut them out and stuck them over the originals. I added dots for the "butterfly trails" (I've yet to see any real butterflies leave dots in their wake but they seem to feature on everything!!!)
My old faithful Spellbinders Jewel Flowers and Flourishes provided the floral element down the side in white and lilac PMD card.
I then foam padded this to the silver mat and added a bit of bling to the flowers.

Still not sure but I can live with it.
Have a good day chaps and remember, if you can't be good.....................blame someone else !!!

TTFN
Ang x

Monday, 3 June 2013

Going Potty........


Good morning everyone. Hope you are all warm and well.
A quick message for Ita. I have tried to leave a comment on your blog and become a follower but my laptop does not like Google+ and therefore I have been unable to do so.......sincere apologies as you have some lovely cards.
Thank you for your kind comments about David's birthday card and thank you David for taking time out of your busy birthday and managing to persevere with getting a comment on.
Today's floral offering is another card for David and was bartered for. He wanted a birthday card for his sister in law and I wanted to borrow his carpet washer so it was a fair swap.
This card was inspired by one done by a very talented lady called Marisa Job, who kindly leaves occasional comments on here. Please visit her blog, if you haven't already, to see some beautiful cards. . . . .marisadesigns.blogspot.co.uk
Marisa's card is a lot less "rustic" looking than mine as she has used plant pot dies. Mine was just cut to a plant pot shape. As you will see below, the card pops out of its pot pocket so you can write a little message inside.


If you are lucky enough to have the Spellbinders Plant Pot dies (as rare as rocking horse poo) then use them as I'm sure you will get a better result.

Firstly, I cut two pieces of scrap card into plant pot shapes of the same size (they are about 4" tall. To make the pocket, I "wrapped" the two pieces in brown wallpaper (don't ask) and stuck it neatly at the back. I then added the rim, edged with pinking shears, grass, flowers and butterfly (flowers, Tonic Daisy Punch and butterfly cut using a Splodgeaway mask as a template).
Next, cut another plant pot shape, I used green card, slightly narrower than the pocket as this will need to fit in the pocket but slightly taller so there's room to add the flowers.
I cut two Spellbinders D-Lites Garden Weave out of the same green card and added them to the top to form a kind of scrolled arch (you will need to trim them to fit).
Flowers and leaves were cut from pink, lilac, purple and green card using Spellbinders Jewel Flowers and Flourishes and Bitty Blossoms.
I put the card in the pocket, then stuck the flowers and leaves on so that  I could gauge where to put the flowers so that they popped over the edge nicely.
I then cut another pot shape, smaller than the card, out of yellow card and edged it with pinking shears. I then embossed it with the Couture Creations Bouquet embossing folder and stuck it to the card.
The label and tags are the two smaller dies from the Spellbinders Decorative Labels Eight set. The smallest two were stamped in purple pigment ink and heat embossed with Cosmic Shimmer clear powder and attached with a narrow purple satin ribbon. The next one was foam padded to the card.
I added a little folded strip of card to the back as a stand and it was done.

Hope you like and thank you Marisa for the inspiration....wish it looked as good as yours !!!
David liked it so, hopefully, will his sister in law.

Btw, the Britannia Die that I used on David's card for the poppies and the fuchsias is a medium rose die which I got from Joanna Sheen as I had seen an excellent tutorial on her website for how to do the fuchsias.

TTFN
Ang x


Saturday, 1 June 2013

Happy Birthday David !!!


Hello again to everyone and a big hello and welcome to Ita, who has joined our crafting posse.
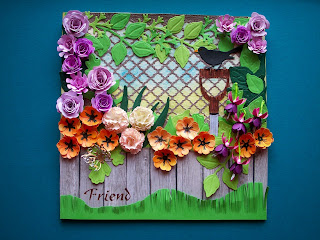
Now, this card has been a labour of love as it took quite a while to construct but I wanted to make something special for my good friend David (he's not the one who is roaming in the gloaming) who has a Chelsea-esque immaculate garden and greener fingers than a Martian.
Its his birthday today (won't reveal to the world how old) so I couldn't show the card beforehand .....David looks but doesn't comment.
Mr Duck did remark that David would have had that "lawn" straight and trimmed but hey I'm a rebel !!!
I will list the bits I have used rather than give a blow by blow account of its construction otherwise you will be snoring very loudly (as will I) by the end of it.

8x8 card base - Papermill Rich cream hammered card.

Background
Spellbinders Fancy Lattice 
Spellbinders Foliage
Kanban "wood" card (part of a free kit)
Broken China, Bundled Sage and Shabby Shutters distress inks

Flowers and embellishments
Spellbinders Bitty Blossoms - Roses
Spellbinders Carnation Creations - Carnations
Britannia Medium Rose die - Orange poppies and fuchsias
Mariannes Collectables - Blackbird.
Spellbinders Jewel Flowers and Flourishes - Butterfly 
Paper Thread - Stamens/stems on fuchsias
Pink Seed Beads - Seed pods on top of fuchsias
Spiced Marmalade, Mustard Seed and Spun Sugar distress inks
Sentiment stamped with Vintage Photo distress ink.
Green card fringed with normal scissors.

Phew !!! I don't think I missed anything. Apologies if I have. Some close ups are below.

I hope that you, and more importantly David, like it but please be gentle with me if you don't.
Hello to Patricia and Hazel if you have managed to get a connection from Dalyan. 

Will be back in a couple of days with another floral creation I've been holding onto.
Thanks to each and everyone of you for taking time to pop by.

TTFN
Ang x


Labels

"Peace" (3) 300 posts prize post (1) Acetate (1) air dry clay (1) Amy Designs Ice Crystal Frame (1) Andy's Clock (1) Anna Griffin Flourish Emblem (5) Ansty Workshop (2) Baby (1) Baby 3D (1) Baby card (1) Baby wrapping paper (1) BeBunni embossing folder (1) Bebunni Snowflake embossing folder (2) Bevelled Glass Striplet (4) bling (3) blog hop (1) blue tit topper (1) Bokeh (2) Box Frame (2) Britannia Medium Rose (2) Butterfly Box (1) buttons (1) Cake (1) Cake design (1) Campervan (1) Card-io Festive Fir Cones (1) Card-io Mum's Garden (3) Card-io Rose Garden (4) Card-io stamps (4) CE Anemone Planter stamp (1) CE Aztec Flowers embossing folder (2) CE Blog Challenge March (Easter) (1) CE Falling Snow embossing folder (1) CE Frosty Swirls (2) CE Frosty Swirls embossing folder (6) CE Garden Frame stamp (1) CE Jacobean Floral embossing folder (8) CE Linen embossing folder (5) CE sentiment (1) CE Snowflake Lattice embossing folder (2) CE Stitched Bunting Numbers stamps (6) CE Swirling Hearts embossing folder (7) CE Tapestry embossing folder (2) CE Tartan Trellis embossing folder (2) CE Tied Together embossing folder (2) Checkerboard embossing folder (1) Cheery Lynn Holly Flourish (9) Cheery Lynn Sweet Christine (3) chevron embossing folder (1) Christmas (1) Christmas Tree Greetings die (1) clock (1) colouring (1) Confetti Vellum (1) Cosmic Shimmer Clear Matt Finish Glaze (2) Couture Creations Rudolf embossing folder (1) Couture Creations Swiss Dots embossing folder (3) Couture Creations Tied Together embossing folder (1) Crafters Companion Christmas Jumper embossing folder (3) Crafters Companion Textures Elements Rain embossing folder (1) Crafts Too Baby Frame (1) Crafts Too Cubis (1) Crafts Too Daisy Lattice (2) Crafts Too Fancy Lattice embossing folder (2) Crafts Too Mariposa (2) Crafts Too Snow Time die (1) Cream card (6) Creative Expressions (1) Creative Expressions Garden Frame stamp (1) Daisy's (6) Darice Chevron embossing folder (1) Die cut magnetic sheets (1) Diwali (1) Docrafts (4) Docrafts All Aboard (2) Docrafts Home for Christmas (1) Docrafts Punch (1) Docrafts Snowflake embossing folder (1) Docrafts X Cut Reindeers Pattern embossing folder (1) Easter (1) Eclectic Anthology (1) Eclipse (1) Embossalicious Floral Vine embossing folder (1) Embossalicious Tumbling Leaves embossing folder (1) Enchanted M-Bossibilities (1) First Edition A Christmas Story pad (1) First Edition Bird Song (2) First Edition Boho Chic (2) First Edition Christmas Wishes (1) First Edition Desert Blooms (1) First Edition Family Ties (2) First Edition Floral Pavilion (3) First Edition Gilded Winter (3) First Edition Isabelle (3) First Edition Love Letters (4) First Edition Neroli (2) First Edition Storyteller paper (1) First Edtion New Bloom (1) Floral Tribute (1) foamiran (1) foiling (1) Forever Friends (1) frame (2) Frosty Swirls embossing folder (2) Fuchsia necklace (1) Fuchsia tutorial (1) Funky foam (2) gilding flakes (3) Go Press and Foil (1) gold gilding flakes (1) gold mica powder (1) gold mirror card (2) Golf (1) Graduation (1) Happy Birthday embossing folder (1) HC Decorative Lace Border (1) HC Delicate Asters (9) HC Sunkissed Fleur (4) Heart Cascade (1) Hobbycraft punch (3) Hobbycutz (12) Hochanda (1) Hope (1) House of Cards (13) hummingbird (1) Hunkydory (1) Hunkydory Christmas cards (1) Hunkydory Peacock (1) Indigo Blu sentiment (1) Inkylicious (1) Inverted Corner Box (1) Inverted Corner Box Tutorial (1) Inverted triple stamping (2) Inverted triple stamping tutorial (1) Janet's Envelope (1) Jewellery (1) JND Aster Leaves (1) JND Bee Balm Frame (3) JND Bee Balm Swirl Leaves. JND Anniversary stamps (1) JND Birds and Cages (6) JND Blossom Die (1) JND Blousy Poppy die (4) JND Box Set (1) JND Camellia die (4) JND Chains (3) JND Christmas (2) JND Christmas Music stamps (1) JND Christmas Rose (2) JND Chrysanthemum (1) JND Deck The Halls stamps (1) JND Deer Scene die (1) JND Elderflower Leaves (1) JND Fern dies (1) JND Festive Greetings (5) JND Festive Silhouettes (2) JND Flourish Leaves (1) JND Foston Fold die (2) JND Gerbera Circles (6) JND Gerbera Panel (7) JND Gerbera Pop Out Circles (2) JND Gerbera Pop Out Panel (1) JND Holly and Ivy die (1) JND Holly and Ivy die. (1) JND Hydrangea (1) JND Hydrangea die (3) JND Ivy Plate (2) JND Large Butterflies (3) JND Leafy Flourish dies (3) JND Media Plate Rectangle dies (1) JND Mini Starflowers (1) JND Oakham (1) JND Oakham Lattice (5) JND Orchid die (3) JND Peony (1) JND Proper Cracker die (1) JND Reveal dies (1) JND Ribbon Threader dies (3) JND Sams Starz (1) JND Scene Box die (2) JND Small Lantern (2) JND Snow Scenes (2) JND Snowflake (2) JND Snowflake Circle embossing folder (1) JND Snowflake Edges die (2) JND Snowflake Lattice (1) JND Snowflake Panel (1) JND Snowflake stamp set (2) JND Snowflakes (1) JND Snowflakes die. JND Festive Sentiments die (1) JND Snowflower Cut and Emboss folder (2) JND Square Scene Box (2) JND Stamford dies (3) JND Star Stream embossing folder. (1) JND Swirl Ivy Leaves dies (2) JND Swirl Sentiments stamps (1) JND Typography Stamp (1) JND While Shepherds Watched stamp set (1) JND Woodford dies (1) JND Woodland Scene Cut and Emboss folder (2) JNDBee Balm Swirl Leaves (1) John Lockwood 12 Days of Christmas pad (6) John Lockwood 12 days of Christmas stamps (1) John Lockwood Cherry Blossom Elements (4) John Lockwood Daffodil Burst (3) John Lockwood Daisy Corner (1) John Lockwood Daisy Corner Elements (1) John Lockwood December's Child (1) John Lockwood Fern Frames Elements stamps (6) John Lockwood Flower Frame Elements (1) John Lockwood Flower Heart Element stamps (2) John Lockwood Flower Hearts Element stamps (2) John Lockwood Heart Striplet stamps (1) John Lockwood Holly Tree Elements stamps (1) John Lockwood Honeysuckle stamp (2) John Lockwood Horticultural Definition stamp (2) John Lockwood Larkspur Elements stamps (4) John Lockwood Lily stamp (2) John Lockwood Michaelmas Daisy Stamp (2) John Lockwood Monday's Child stamps (1) John Lockwood Nasturtium Elements stamps (4) John Lockwood Nasturtium Everyday Sentiments stamps (4) John Lockwood November's Child (1) John Lockwood Partridge in a Pear Tree stamps (3) John Lockwood Peony Elements stamp (1) John Lockwood Peony Elements stamps (3) John Lockwood Peony rubber stamp (2) John Lockwood Quattro Stars mask (1) John Lockwood Rosebud Elements stamps (5) John Lockwood Spring Shades paper pad (1) John Lockwood Summers Child stamp (2) John Lockwood Violet Elements stamps (1) John Next Door Anniversary Sentiments stamps (2) John Next Door Autumn Flowers stamps (7) John Next Door Build a Wreath (4) John Next Door Build a Wreath stamp set (2) John Next Door Butterfly Corners stamps (5) John Next Door Butterfly Frames stamps (4) John Next Door Christmas Scene stamp set (2) John Next Door Christmas Textures (2) John Next Door Christmas Textures stamps (1) John Next Door Circle Leaves stamps (1) John Next Door Confetti embossing folder (1) John Next Door Festive Silhouettes stamp set (2) John Next Door Flower Circle stamps (4) John Next Door Holly and Ivy (1) John Next Door Mini Tags Dies (4) John Next Door Opera Box dies (1) John Next Door Quattro Drops Mask (3) John Next Door Sandwich Box Dies (6) John Next Door Sentiment stamps (3) John Next Door Snowflake Circle embossing folder (3) John Next Door Spring Flower stamps (5) John Next Door Star Flower dies (1) John Next Door Star Flower Leaves dies (1) John Next Door Star Stream embossing folder (1) John Next Door Summer Flowers stamps (4) John Next Door Swirl Ivy Leaves (1) John Next Door Waves Duo Mask (2) John Next Door Winter Flowers stamps (3) John Next Door Winter Trees embossing folder (1) John Next Door Winter Trees stamps (1) John's samples (1) Joy's thank you (1) Jus Cutz A4 Rectangles (1) Kaisercraft Holiday Love Stamp (1) Krylon Gold Leaf pen (4) Lace (1) Language of Flowers (5) Leane Creatief Border Branch (1) Lidl card (3) Lidl paper (1) Lilia's Clock (1) Lindsay Mason Personal Impressions stamp (2) Luca's Clock (1) Map (1) Marianne poinsettias (1) MAWTT (71) Memory Box Alphabet Dies (8) mica (3) Mint gilding polish (1) Mr D birthday (1) Multi Layer Stag Stamps (1) Musical notes (1) NEC Stash March 2015 (1) Nelly Snellen Holly (1) Nesta's Necklace (1) New Home (1) Oldie for Friday (7) padded heart (1) Peacock blue card (1) Peacock Feathers mask (1) pearls (1) pincking shears (1) Pink Flap Box (1) PMD (4) PMD card (21) Polished Silk Glitters (1) Precious Marieka Fantastic Flowers Foliage (1) Quilted Blocks Striplet (1) red mirror card (1) Review of 2016 (1) ribbon (1) Rosie (1) SB 2012 Holiday Tree (2) SB A2 Bracket Borders (3) SB A2 Matting Basics A & B (3) SB Adorning Squares (3) SB Art Deco Tags (1) SB Bitty Blossoms (17) SB Blossom (1) SB Blossoms Three (2) SB Botanical Swirls and Accents (7) SB Butterflies (1) SB Butterfly Circles (3) SB Camellia Border (1) SB Captivating Squares (6) SB Carnation Creations (5) SB Classic Diamonds (4) SB Classic Ovals (5) SB Curved Borders 2 (4) SB Dahlia (1) SB Decorative Labels 25 (1) SB Decorative Labels 28 (9) SB Decorative Labels 8 (1) SB Delightful Circles (2) SB Elegant Labels 4 (1) SB Elizabeth Border Strip (2) SB Fancy Lattice (1) SB Fancy Postage Stamps (5) SB Fancy Tags 1 (Framed) (2) SB Fancy Tags 3 (5) SB Fancy Tags Three (1) SB Fancy Tags Two (8) SB Filigree Delight (5) SB Foliage (3) SB Grand Ovals (2) SB Grate Works (1) SB Heirloom Ornaments 2010 (3) SB Imperial embossing folder (2) SB Intertwined Spirals (2) SB Iron Works Motifs (1) SB Ivy (D-lite) (2) SB Jewel Flowers & Flourishes (4) SB Labels 18 (1) SB Labels 25 (1) SB Labels 28 (3) SB Labels 4 (3) SB Labels 9 (1) SB Labels Twenty (2) SB Labels Twenty Eight (3) SB Layered Poinsettias (8) SB Lonely Hearts (2) SB M-Bossibilities Imperial embossing folder (1) SB M-Bossibilities Patchwork embossing folder (1) SB Majestic Labels 25 (1) SB Mary Border Strip (2) SB Matting Basics A (3) SB Matting Basics A & B (5) SB Matting Basics B (3) SB Medallion 1 (2) SB Medallion 4 (1) SB Peony (1) SB Poinsettias (1) SB Ravenna (1) SB Reflective Moment (1) SB Scalloped Ovals (3) SB Snowflake Pendant 2013 (9) SB Swirl Stripe Panel (2) SB Tapestry (2) SB Tiger Lily (2) SB Tisted Palm (1) SB Twisted Metal Tags and Accents (1) Scraperboard (3) sewing (1) Sheena Douglass Holly embossing folder (3) show samples (1) Silver (1) silver Krylon pen (1) Sissix Hearts (3) Sissix Hexagons (1) Sissix Squares (12) slate (1) Small snowflake die (1) Snow (2) Snowflake Border (1) Snowflake Mini Striplet (1) Soft gold card (2) Spectrum Noirs (5) Splodgeaway Masks (1) Stamping Up (1) Starry Night die (1) stitching (1) Stitchy Bear (1) Sue Wilson 2015 Angel (1) Sue Wilson Ara Mini Gemini (2) Sue Wilson Catkin Stems (1) Sue Wilson Christmas Tree Greetings (2) Sue Wilson Chrysanthemum dies (1) Sue Wilson Cygnus Gemini (1) Sue Wilson Doodle Rose Wreath (6) Sue Wilson Holly Octagonal Frame (3) Sue Wilson Indian Ocean Background (2) Sue Wilson Jacobean Floral embossing folder (1) Sue Wilson Lotus Striplet (1) Sue Wilson Maidenhair Fern (1) Sue Wilson Mauritius (1) Sue Wilson Mini Snowflake Striplet (2) Sue Wilson Orange Blossom Leaves (1) Sue Wilson Peace (1) Sue Wilson Rococo Striplet (2) Sue Wilson Snowflake Corner Border and Tag dies (3) Sue Wilson Snowflake Gemini (2) Sue Wilson Timeless Striplet (1) Sue Wilson Ursa Gemini (3) SW Ara Mini Gemini die (1) SW Cape Daisies (1) SW Catkin Stems (1) SW Christmas Tree Greetings (1) SW Cygnus Gemini (3) SW Indian Ocean Background dies (3) SW Mauritius dies (4) SW Orange Blossom Leaves (1) SW Ornate Octagons Striplet (1) SW Snowflake Borders and Tags (1) SW Snowflake Gemini (1) SW Snowflake Mini Striplet. SW Let it Snow (1) SW Stitched Animals (1) SW Tahiti die (2) SW Trailing Ivy (1) SW Twinkle Edger (1) Swarovski (1) Tatty Teddy (1) Texture Paste (2) That Special Touch Celtic mask (1) That Special Touch Delicate mask (1) That Special Touch Elegance Mask (2) That Special Touch Moroccan Mask (1) The BGS (2) The Ducks Doodahs Launch (1) The Striplet (17) The Tapestry (1) Tied Together embossing folder (1) Tonic Punch (1) TST Elegance mask (2) TST Fanciful mask (1) Ursa Gemini (1) Wedding (1) White card (15) Wisteria (1) X Cut Alphabet Die (4) X Cut Extra Large Circles (4)